I recently came across a gorgeous Cashmere sweater at a thrift store - in the pink I've always associated with Big Miss A. I knew right off that that sweater was coming home with me :) I actually managed to turn it into both pants and a shirt for her :) I'll start with the pants for this tutorial. I've found that the size of sleeves so far almost always yields pants that are around a size 4-5, tho they fit my 2 1/2 year old with a fair bit of room to spare since the cuffs just bunch a little at the ankle, or can be turned up. I'd also say that a thinner sweater is ideal, and it should be very soft, - an itchy sweater will surely be rejected, and understandably so ;)
Part 1 - The Pants :)
I want to start off by saying that my inspiration started with my lovely friend Claire.
First you need to grab a pair of leggings that fit your child well. You're going to lay them on the sweater like so:
I'm afraid you'll have to bear with me - I tend to sew by eyeballing - especially for repurposing things. As you can see in the picture (hopefully) the pants are folded in half and the crotch side (is there a technical term that is more appropriate here lol?) is lying in the armpit. I cut along the curve there, but left the other side alone (the outer edge of the pants, and the upper part of the arm of the sweater) You could be more specific with your cuts at this point if you wanted the pants narrower, or shorter. I followed the path of least resistance ;) (and the fewest seams ;) )
I cut the top edge shorter than on the pants that I'm using as a guide, for 2 reasons: 1. These pants are a bit long in the waist for my daughter, and 2. The waist band that I'm going to attach is around 2-3 inches. I would suggest that you look ahead and decide how you are going to do the waistband to decide the length here.
Next you will take one sleeve and turn it inside out. You will take the other sleeve which should be right side out, and put it inside the inside out sleeve. Line them up so that they fit exactly inside each other, line up the seams and sew the 2 pieces together along the curve. I used my serger for this. You could use a regular sewing machine for this I think, if you felted the sweater a bit first.
This photo shows the pieces together as described before I sewed them together - the top layer is folded back a little to show all the pieces clearly. When you sew, you pick up the top 2 layers and sew your seam starting at the top of the waist, and down the curve to the other end. This part always makes me a little cross eyed lol! And actually the first time I tried making pants this way I sewed one leg inside out! So do pay attention to make sure you've got everything where you want it.
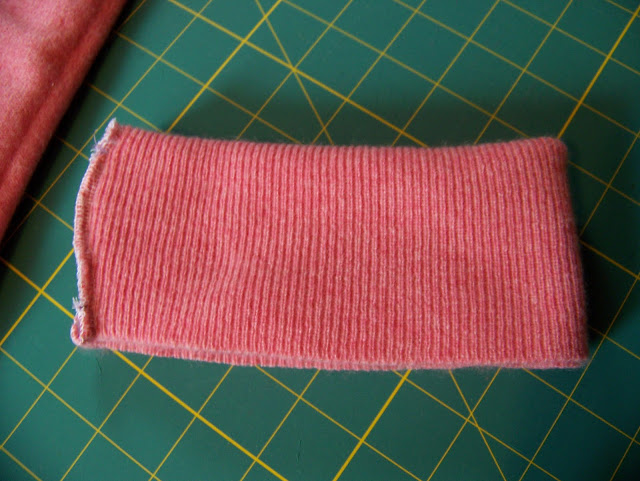
On this sweater there was a convenient turtleneck type collar - if your sweater doesn't have one, you could either steal on from another sweater, or cut one from the body of the sweater. You want this to be the right size to go around your child's waist, with a little extra for a seam allowance. It was exactly the right size - I just trimmed the top straight.

Fold it in half, and sew together so that you have the waist band.
Like so :)
Ok - the next part is probably the hardest part to explain, so here goes ;)
Open up your pants and lay them in front of you with the waist up. They should be inside out.
You place the waist band inside the pants, with the raw edge at the top, and right sides together. Am I making sense? (I hope so :) )

Voila! You're done :) Wasn't that easy?
Please feel free to leave any questions in the comments.
Enjoy :)
P.S. Stay tuned for the second part of this tutorial where I explain the shirt :)


You are wonderful. And I need to call you and hear your voice. soon.
ReplyDeleteWell that was the best comment i've gotten yet :) I think you're pretty darned wonderful too :) Call me! I've missed you ...
ReplyDeleteI love this! I hope I can find the shirt part on your blog!
ReplyDeleteUgh - I never did the shirt tutorial - I was in serious wingin it mode when I made it and was so focussed that I didn't take enough pictures. Essentially all I did was to take one of my daughter's shirts that I liked the fit of, and used it roughly for a pattern. I used the hem of the sweater for the bottom edge of the shirt. For the neckline, I cut a strip that was about an inch, and sewed it the same you would bias tape - angry chicken has an excellent tutorial on her blog. One of these days I'll make another one and take pictures ;) It's been a crazy winter for us - just constant sickness rotating through our family. It's got to end sometime, and then I'll be present here a lot more.
ReplyDelete